Mr & Mrs Crochet Pillows
This crochet pillow pattern will melt your heart and always remind you of the best day of your life.
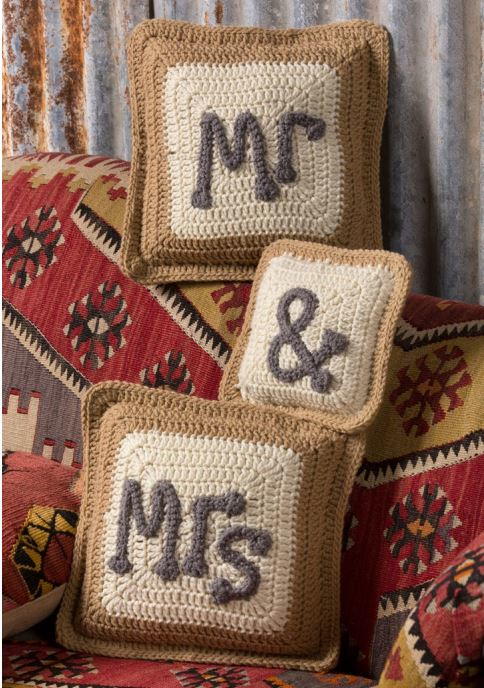
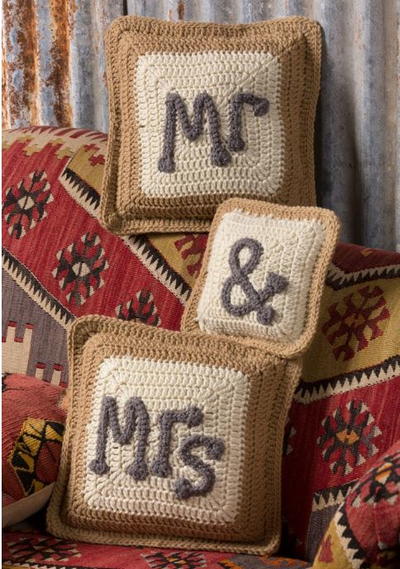
These Mr and Mrs Crochet Pillows are an adorable DIY wedding craft you could use in so many ways. Use this precious crochet pillow pattern to create ideal wedding photo props, photo booth props, or decorations for your reception. Wherever you use them, these crochet pillow covers will have your guests saying "Awww" and marveling at your love. And once the wedding is over, you can bring these crochet pillows home and display them on your bed or sofa to remind you and your sweetie of the most magical day of your lives. You'll love how this free crochet pattern turns out because it will always remind you of the day you wed the love of your life.
Estimated Cost$11-$20
Time to CompleteLonger than a weekend
MaterialsYarn
Primary TechniqueCrochet

Materials List
- RED HEART® With Love®: 1 skein each of 1303 Aran (yarn A), 1401 Pewter (yarn B), and 1308 Tan (yarn C)
- Susan Bates® Crochet Hook: 4mm [US G-6]
- Two 12” (30.5 cm) square pillow forms, one 8” (20.5 cm) square pillow form, pins, yarn needle
Crochet Pillow Pattern
Each pillow is made from two sides. The letters are worked separately, as long strips of crochet that are arranged on the front of each pillow and sewn in place. Two sides (front and back) are sewn together, a pillow form inserted, and edging round worked to complete each pillow.
Side for Large Pillow
Make four (2 for each pillow).
-
With A, ch 4; join with slip st in first ch to form a ring.
-
Round 1 (right side): Ch 3 (counts as first dc here and throughout), 11 dc in ring; join with slip st in top of beginning ch—12 dc.
-
Round 2: Ch 3, *(2 dc, tr) in next st, (tr, 2 dc) in next st (corner made), dc in next st; repeat from * 2 more times, (2 dc, tr) in next st, (tr, 2 dc) in next st; join with slip st in top of beginning ch; join with slip st in top of beginning ch—28 sts (5 dc across each side between 2-tr at corners).
-
Round 3: Ch 3, dc in next 2 sts, *(2 dc, tr) in next st, (tr, 2 dc) in next st, dc in next 5 sts; repeat from * 2 more times, dc in last 2 sts; join with slip st in top of beginning ch—44 sts (9 dc across each side).
-
Round 4: Ch 3, dc in next 4 sts, *(2 dc, tr) in next st, (tr, 2 dc) in next st, dc in next 9 sts; repeat from * 2 more times, dc in last 4 sts; join with slip st in top of beginning ch—60 sts (13 dc across each side).
-
Round 5: Ch 3, dc in next 6 sts, *(2 dc, tr) in next st, (tr, 2 dc) in next st, dc in next 13 sts; repeat from * 2 more times, dc in last 6 sts; join with slip st in top of beginning ch—76 sts (17 dc across each side).
-
Round 6: Ch 3, dc in next 8 sts, *(2 dc, tr) in next st, (tr, 2 dc) in next st, dc in next 17 sts; repeat from * 2 more times, dc in last 8 sts; insert hook in top of beginning ch, yarn over with C and draw through all loops on hook to complete round and change color—92 sts (21 dc across each side). Fasten off A
-
Round 7: With C, ch 3, dc in next 10 sts, *(2 dc, tr) in next st, (tr, 2 dc) in next st, dc in next 21 sts; repeat from * 2 more times, dc in last 10 sts; join with slip st in top of beginning ch—108 sts (25 dc across each side).
-
Round 8: Ch 3, dc in next 12 sts, *(2 dc, tr) in next st, (tr, 2 dc) in next st, dc in next 25 sts; repeat from * 2 more times, dc in last 12 sts; join with slip st in top of beginning ch—124 sts (29 dc across each side).
-
Round 9: Ch 3, dc in next 14 sts, *(2 dc, tr) in next st, (tr, 2 dc) in next st, dc in next 29 sts; repeat from * 2 more times, dc in last 14 sts; join with slip st in top of beginning ch—140 sts (33 dc across each side).
-
Round 10: Ch 3, dc in next 16 sts, *(2 dc, tr) in next st, (tr, 2 dc) in next st, dc in next 33 sts; repeat from * 2 more times, dc in last 16 sts; join with slip st in top of beginning ch—156 sts (37 dc across each side between 2-tr at corners). Fasten off.
Side for Small Pillow
Make 2.
-
With A, ch 4; join with slip st in first ch to form a ring.
-
Rounds 1–7: Work same as Rounds 1–7 of Side for Large Pillow—108 sts (25 dc across each side). Fasten off.
Ampersand ("&" for small pillow)
-
With B, ch 48.
-
Row 1: Work (3 dc, ch 2, slip st) in 3rd ch from hook (first end of letter made), sc in each remaining ch across.
-
Row 2: Turn, skip first 2 sc, (2 dc, ch 2, slip st) in next sc (second end made); leave remaining sts unworked.
-
Fasten off. Shape piece into an “&”, pinning in place on one of the Sides for Small Pillow. Sew in place and remove pins.
Letter "M"
Make 2 (one for each large pillow).
-
With B, ch 51.
-
Rows 1 and 2: Work same as Rows 1 and 2 of Ampersand.
-
Fasten off. Shape piece into an “ M”, pinning one “ M” in place on each of two Sides for Large Pillow. Sew in place and remove pins.
Letter "R"
Make 2 (one for each large pillow).
-
With B, ch 20.
-
Rows 1 and 2: Work same as Rows 1 and 2 of Ampersand.
-
Fasten off. Shape piece into an “r”, pinning one “r” in place following each “ M”. Sew in place and remove pins.
Letter "S"
Make one for "Mrs" large pillow.
-
With B, ch 25.
-
Rows 1 and 2: Work same as Rows 1 and 2 of Ampersand.
-
Fasten off. Shape piece into an “s”, pinning in place following the “r”. Sew in place and remove pins.
Finishing
-
Assemble Large Pillows: Hold one front (with letters) and one back (with no letters) with wrong sides together. With yarn needle and C, sew pieces together across three sides, sewing between Rounds 9 and 10. Insert pillow form and sew fourth side closed.
-
Edging Round: With right side facing and working in back loops only of Round 10 of both thicknesses, join C with slip st, slip st all the way around. Fasten off.
-
Assemble Small Pillow: Assemble same as large pillow, using A to sew piece together between Rounds 6 and 7. Work Edging Round, same as for large pillow. Weave in ends.
Abbreviations
- A, B, or C
- Colors A, B, or C
- ch
- chain
- dc
- double crochet
- sc
- single crochet
- st(s)
- stitch(es)
- tr
- treble (triple) crochet
- ( )
- work directions in parentheses into same st
What wedding crochet patterns have you fallen in love with?
Read NextMr & Mrs Crochet Pillows

