Tie the Knot DIY Plates
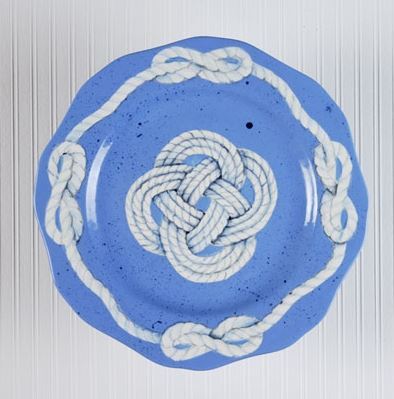
Don't go out and buy fancy plates for your nautical-themed wedding. Instead, paint them yourself! You're not going to find a more perfectly nautical design than these Tie the Knot DIY Plates, anyway. The speckled design of the navy paint against the paler blue gives these plates a weathered, genuine look, and the slightly scalloped edging of the plate themselves give it them a hint of uniqueness. Try painting some in shades of gray and green for plates that are every color of the ocean.
Time to CompleteIn an evening
Primary TechniquePainting

Materials List
- iLoveToCreate Provence Dinner Plate
- Brushes: iLoveToCreate SB 807 No. 6 Fan Glaze, SB 803 No. 4 Liner, and SB 802 No. 1 Liner
- Duncan Pure Brilliance Clear Glaze
- Paint: iLoveToCreate CN 121 Light Nautical, CN 123 Dark Nautical, CN 244 Really White, CN 253 Black
- Tools: Scissors, Pencil, Potter's sponge, Toothbrush
- Paper: Clear adhesive-backed shelf paper, Tracing paper
- Paper Towels
- Container for water
- Foil for palette
Pattern:
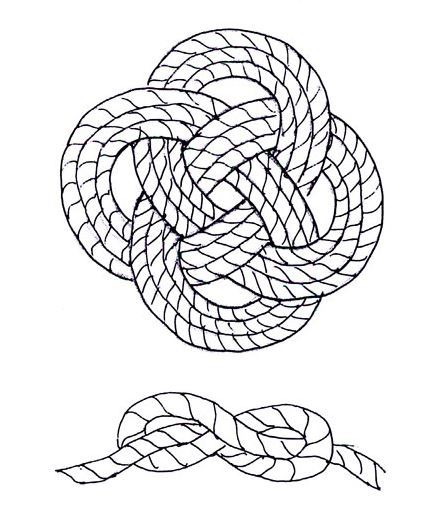
Instructions
-
Wipe ware with damp sponge to remove bisque dust.
-
Using pattern, trace outlines of knot and rope border on clear adhesive paper (non-adhesive side up). Cut out designs.
-
Remove adhesive backing from cutouts and place decorative knot in center of plate, making sure edges are sealed. Repeat with rope border stencil around plate.
-
Using potter's sponge, sponge three coats of Light Nautical onto plate, including over cutouts to get color in small openings. Let dry between coats.
-
Turn plate over to reverse side and apply three coats of Light Nautical. Let dry between coats.
-
Dip toothbrush bristles into Dark Nautical and spatter over plate by flicking bristles back with fingers. Let dry. If desired, repeat on backside.
-
Remove cutouts. Using No. 4 Liner, paint three coats of Really White onto center knot and rope border. Let dry between coats.
-
Place tracing paper over original patterns and trace over designs with pencil. Flip tracing paper over pencil side down onto plate, lining up details with knot in center. Trace over lines to transfer onto knot; the carbon from the pencil tracings on the underside of tracing paper will transfer to paint when traced over. Repeat process for border rope.
-
Dilute a small amount of Dark Nautical then side load the No. 4 Liner with diluted color. Float along edges of ropes where strands cross over or under the knots. use No. 1 Liner to paint fine segment lines in rope with the diluted Dark Nautical. Let dry.
-
Dilute a small amount of Light Nautical then use the No. 1 Liner to add shadow to lines to separate each rope segment. Refer to photo.
-
Use the No. 1 Liner to paint Black accents on rope for definition. Refer to photo.
-
Using Fan Glaze brush, carefully paint one coat of Pure Brilliance over entire front and backside of plate. Let dry.
-
Stilt and fire to witness cone 06
Read NextScrabble Tile Table Numbers

