How to Crochet a Flower Necklace
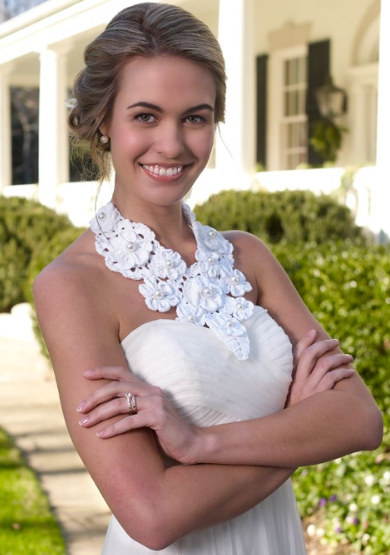
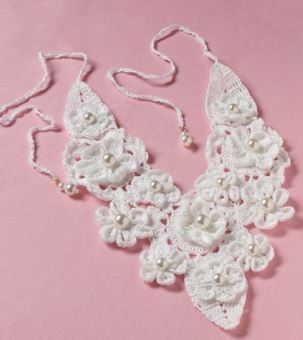
Blow everyone away with bridal attire like none other. Your look will be truly unique when you wear this stunning crochet flower necklace. If you don't crochet, this would make a wonderful and personal wedding gift for a close friend or family member to give you. This tutorial teaches you How to Crochet a Flower Necklace that looks breathtaking with a strapless dress. If you don't feel comfortable wearing a dress without straps, you can even secure the crocheted flowers necklace to your dress as a means of holding it up. Make the bridesmaids matching pieces in a different color to give them a gift they'll never forget.
Time to Complete: Weekend project
Primary Technique: Crochet

Estimated Cost: $11-$20
Materials:
- AUNT LYDIA’S® Classic Crochet Thread, Size 10: 1 ball white
- Steel Crochet Hook: 1.5mm [US 7]
- Round-nose, chain nose, and split ring pliers
- Wire cutter
- 5- 14 mm pearls
- 7- 10mm pearls
- 2- 2mm pearls
- 2- 4mm pearls
- 2- 8mm pearls
- 2 gold head pins
- 2- 7mm split rings
- Fabric glue
- Necklace pattern
Instructions:
Necklace measures 12” (31cm) long x 10” (25cm) wide, excluding ties. GAUGE: Small flower = 1½” (4cm) diameter. CHECK YOUR GAUGE. Use any size hook to obtain gauge.
ABBREVIATIONS
Ch=chain
dc=double crochet
sc=single crochet
sl st=slip stitch
st(s)=stitch (es)
tr=treble crochet
[ ]= work directions in brackets the number of times specified
*=repeat whatever follows the * as indicated
CENTER MAIN MOTIF
Ch 4, join with slip st to form a ring.
Round 1: Ch 3 (counts as dc), 23 dc in ring. Join with a slip st in beginning ch-3—24 dc.
Round 2: Ch 3, dc in same space, 2 dc in each dc around, join—48 dc.
Round 3: Ch 3, dc in each dc around, join.
Round 4: *Ch 5, skip 2 dc, slip st in next dc; repeat from * around, ending slip st in base of beginning ch-5—16 loops.
Round 5: Slip st in ch-5 loop, ch 4, 13 tr in same space, *slip st in next ch-5 loop, 14 tr in next loop; repeat from * around, join—8 petals.
Round 6: Slip st in 3rd tr, *[ch 5, dc in same space, skip 2 tr, slip st in next tr] 3 times (double loops made), slip st in next 5 tr; repeat from * around, join. Fasten off.
SECOND MAIN MOTIF
Rounds 1-5: Work as for center main motif.
Round 6: Slip st in third tr, *ch 5, dc in same space, skip 2 tr, slip st in next tr, ch 2, slip st in third ch any corresponding second double loop of center motif, ch 2, dc in same space as last ch 2, skip 2 tr, slip st in next tr, ch 5, dc in same space, skip 2 tr, slip st in next tr, ch 3, dc in same space, skip 4 tr, slip st in next tr; repeat from * once more, complete row as for center main motif.
THIRD MAIN MOTIF
Work as for second main motif, joining to opposite side of center motif.
LARGE FLOWER (make 5)
Ch 4, join with slip st to form a ring.
Round 1: Ch 3 (counts as dc), 11 dc in ring. Join with a slip st in beginning ch-3—12 dc.
Round 2: *Ch 5, slip st; repeat from * around, ending with slip st in beginning ch-5—12 loops.
Round 3: Slip st in ch-5 loop, ch 3, 2 dc, 12 tr, 3 dc in same space (beginning petal made), slip st in next ch-5 loop, 3 dc, 12 tr, 3 dc in next ch-5 loop, slip st in next ch-5 loop; repeat from * around, ending slip st in beginning ch-3. Fasten off—6 petals.
SMALL FLOWER (make 7)
Ch 4, join with slip st to form a ring.
Round 1: Ch 1, 12 sc in ring, join with a slip st in beginning sc—12 sc.
Round 2: *Ch 5, skip next sc, slip st in next sc; repeat around ending slip st in base of beginning ch-5.
Round 3: Slip st in ch-5 loop, ch 3, 12 dc in same space, *slip st in next ch-5 loop, ** 13 dc in next ch-5 loop; repeat from * around, ending last repeat at **. Join with a slip st in beginning ch-3. Fasten off.
TOP LEAF (make 2, one on each side)
Row 1: On right side, join thread with a slip st in ch-5 loop of second double loop of third petal from right (left) of center. Ch 3, 4 dc in same space, 5 dc in next ch-5 loop, 2 dc in next ch-3 loop, 5 dc in each of next 2 ch-5 loops, ch 3, turn—22 dc.
Row 2: Dc in next 9 dc, skip 2 dc, dc in next 9 dc, dc in top of ch 3, ch-3, turn—20 dc.
Row 3: Dc in next 8 dc, skip 2 dc, dc in next 9 sts, ch 3, turn—18 dc.
Row 4: Dc in next 7 dc, skip 2 dc, dc in next 8 sts, ch 3, turn—16 dc.
Row 5: Dc in next 6 dc, skip 2 dc, dc in next 7 sts, ch 3, turn—14 dc.
Row 6: Dc in next 5 dc, skip 2 dc, dc in next 6 sts, ch 3, turn—12 dc.
Row 7: Dc in next 4 dc, skip 2 dc, dc in next 5 sts, ch 3, turn—10 dc.
Row 8: Dc in next 3 dc, skip 2 dc, dc in next 4 sts, ch 3, turn—8 dc.
Row 9: Keeping last loop of each st on hook, dc in next 2 dc, skip 2 dc, dc in next 3 sts, yo, pull through all loops on hook. Do not fasten off. Ch 76 (for tie), sc in second ch from hook and each sc across, join with slip st to tip of leaf. Fasten off. Repeat on opposite end of necklace.
BOTTOM LEAF
Work as for top leaf over 2 bottom petals of center motif; omit ch 76 and fasten off.
FINISHING
Weave in ends. Glue a large flower to center of each main motif. Glue a small flower to center of each main motif. Glue a small flower on each leaf. Glue a small flower on top between center and side motifs. Glue a large flower directly under small flower in between motifs. Repeat on other side. Glue a small flower on both sides of bottom leaf next to large flower. Let dry. Glue one 14
mm pearl to center of each flower and one 10mm pearl to the center of each small flower.
TIE DANGLES (make 2)
Slide a 2mm, 8 mm and a 4mm pearl bead on head pin. With round nose pliers form a loop, insert a split ring. Use chain nose pliers to pull tail of wire and wrap around loop at top of bead. Trim the wire close to the bead. Use pliers to press end down. With split ring pliers attach split ring to sc at end of tie.
Read NextEnchanted Garden Wedding Earrings
Your Recently Viewed Projects
Emma
Aug 01, 2017
Love this necklace piece! It almost looks like that it's apart of the dress in the picture. This is a great statement necklace to wear because it's not over the top, it's super simple and elegant!
Report Inappropriate Comment
Are you sure you would like to report this comment? It will be flagged for our moderators to take action.
Thank you for taking the time to improve the content on our site.

