DIY Wedding Wildflower Gift Boxes
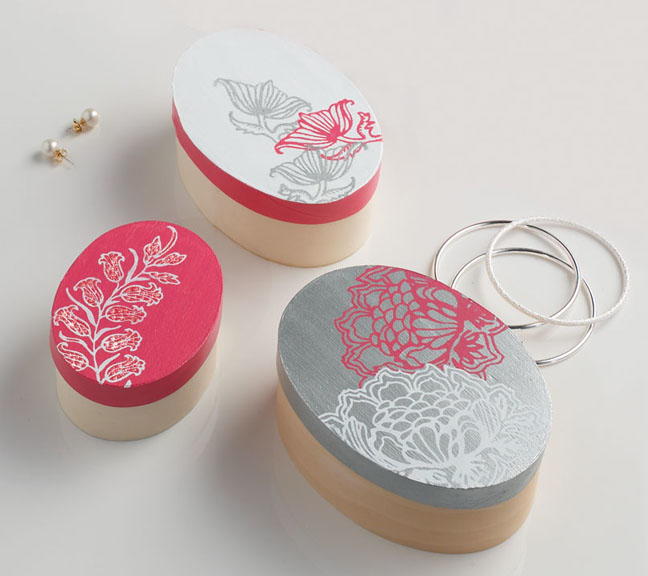
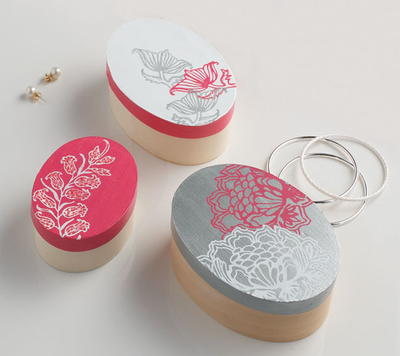
These DIY Wedding Wildflower Gift Boxes are lovely for any spring wedding. It's easy to achieve this elegant floral design without an art degree, making these painted gift boxes the perfect wedding favor. Using glitter paint as an accent adds an eye-catching sparkle that can dress up even the dreariest of table settings. Fill these pretty gift boxes with candies or other small treats, or leave them empty - they make a great gift all on their own. When you mention that each one is painted by hand, you don't have to mention that you used a stencil!
Time to CompleteIn an evening
Primary TechniquePainting

SeasonSpring
Project TypeParty Favors
Materials List
- Martha Stewart Crafts 2oz Multi-Surface Satin Acrylic Craft Paint - Raspberry Ice
- Martha Stewart Crafts 2oz Multi-Surface Satin Acrylic Craft Paint - Wedding Cake
- Martha Stewart Crafts 2oz Multi-Surface Metallic Acrylic Craft Paint - Sterling
- Martha Stewart Crafts 2oz Multi-Surface Glitter Acrylic Craft Paint - Candy Apple
- Martha Stewart Crafts Foam Pouncers Set - 6pc
- Martha Stewart Crafts Stencil Tape
- Martha Stewart Crafts Wildflowers Adhesive Silkscreens
- Gift boxes
- Brush basin or container for water
- Paper towels
Instructions:
- The silkscreened trio of chipwood boxes was decorated using a combination of Raspberry Ice and Wedding Cake Satin paint and Sterling Metallic paint. Allow each color ample drying time prior to overlapping silkscreen designs.
- Embellish or accent a silkscreened design with Candy Apple Glitter paint. Note: Glitter paints can be applied after a design is silkscreened using a brush, not through a silkscreen as glitter particles are too large to pass through the screen.
- To prepare wood boxes, begin by basecoating lids in color of choice, allow to dry, sand smooth and reapply base color.
- Using scissors, cut silkscreen designs apart following printed division lines.
- Peel silkscreen from backing sheet; set backing aside and save for silkscreen storage.
- Peel silkscreen from backing sheet; set backing aside and save for silkscreen storage.
- Position silk screen on project surface where desired; press in place. If desired, add a section of stencil tape to help hold silkscreen in place.
- Apply paint through silkscreen using either the Squeegee Tool Technique or the Foam Pouncer Tool Technique.
- Squeegee Tool Technique: Squeeze a small amount of paint onto solid edge of silkscreen. Holding squeegee tool at a 45 angle with light pressure, pull the paint across the opening of the silkscreen. Continue painting until the entire design area has been silkscreened. Set squeegee aside in container of water for cleaning. Immediately, while paint is still wet, neatly and carefully lift silkscreen by peeling away from the project surface. NOTE: Be careful not to drag silkscreen while removing it as your painted design may be blurred.
- Foam Pouncer Tool Technique: Squeeze a small amount of paint onto foam plate. Load the flat bottom edge of the foam pouncer with paint by dabbing into the puddle of paint. Dab a few times more on a clean spot on the foam plate to ensure you have the entire foam pouncer loaded properly. Holding the foam pouncer as you would a pencil, begin dabbing straight up and down over the opening of the silkscreen. Continue painting until the entire design area has been painted. Set foam pouncer aside in container of water for cleaning. Immediately while paint is still wet, neatly and carefully lift silkscreen by peeling away from the project surface. NOTE: Be careful not to drag silkscreen while removing it as your painted design may be blurred.
- Continue adding silkscreen designs over surface until desired effect is achieved. NOTE: When repeating a design, it is best to clean the silkscreen between uses by rinsing in water and allowing the silkscreen to dry thoroughly.
- Set completed project aside for 1 hour to thoroughly dry.
- All project surfaces painted with Martha Stewart Crafts Multi-Surface Paints should be cured to increase the paints durability. Follow either the Bake to Cure Technique when decorating a glass or ceramic surface, the Air Cure Technique when decorating wood, terra cotta, paper mache or tin and use the Heat Setting to Cure Technique when decorating fabrics.
- Bake to Cure Technique: Set dry silkscreened glassware into cool oven. Set oven to 350F and bake for 30 minutes. Glass must heat gradually with the oven to avoid breakage. Do NOT place glass in a hot oven. After 30 minutes, turn the oven off. Allow glass to cool completely in oven. Wait 72 hours before using. NOTE: Glitter Glass Paints should not be baked to cure; only use air cure technique when painting with glitter paints.
- Air Cure Technique: Air dry completed project for 21 days before using. NOTE: Glitter Glass Paints should not be baked to cure; only use air cure technique when painting with glitter paints.
- Heat Setting to Cure Technique: Allow your decorated fabric to air dry 24 hours then heat set using either one of two recommended methods.
- Dryer Method: Turn garment inside out; place item in dryer for 30 minutes on highest setting allowed for the type of fabric used. Iron Method Place decorated item right side up on ironing board; cover with dry pressing cloth. Set iron to highest setting allowed for fabric used. Place dry iron (no steam) on area pressing for 30 seconds, lift iron moving to another area until all sections are heat set.
Read NextLovely Hearts DIY Crochet Throw

