Vintage Wedding Chair and Pillow
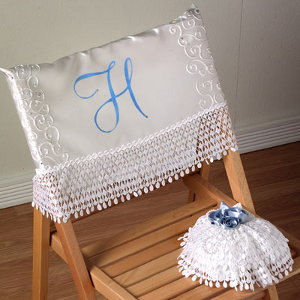
Every princess needs her throne, and this is the perfect wedding DIY to create that. This Vintage Wedding Chair and Pillow helps you design both a beautiful chair and a delicate little ring pillow. Right at home at a vintage wedding, this lacy chair could be created for the ceremony itself. It'd also be a great gift for the bride on the day of her wedding. Consider using a comfy chair and gifting it to the bride-to-be as a place for her to get her hair and make-up done.
Time to complete: Weekend project
Primary Technique: Sewing

Estimated Cost: $21-$30

Materials:
- Aleene's® Platinum Bond Super Fabric™ Textile Adhesive
- Tulip® Dimensional Fabric Paint - White Metallics (65400)
- Tulip Soft® Fabric Paint - Cool Blue (15794), Cornflower (15821)
- Tulip® Glam-It-Up!™ Iron-On Crystals™
- Cosmetic sponge
- Pearls, 1 yard strung
- Scissors
- Heavy lace yardage, 4” wide, 4 to 5 yards
- Cutting mat
- Foil
- Fabric, 1 yard white satin
- Straight pins
- Freezer paper
- Sewing machine
- Craft knife
- Iron or Creative Textile Heat Tool by Walnut Hollow®
- Needle and white thread
- Ribbon, double sided blue satin
- Ring pillow
Instructions:
Pillow:
1.) If pillow has lace around edge, it will need to be removed or cut off.
2.) Cut 2 yards of lace.
3.) Sew a running stitch along straight edge, using needle and thread.
4.) Gather, to measure about one yard.
5.) Starting outside of center, glue edge of lace in a spiral to cover pillow, using Super Fabric Textile Adhesive.
NOTE: Allow first layer of lace to extend over edge of pillow. Stop lace to leave a small circle of pillow showing on top center area. Hold lace in place with straight pins until glue is dry.
6.) Loop pearls four times (or desired number) so loops hang onto lace. Glue ends in circle, to pillow.
7.) To create ribbon roses, fold over end of a 14” piece of ribbon. Sew a running stitch along one side of ribbon and at end.
8.) Fold ribbon back. Pull thread to gather.
9.) Arrange in a spiral to create rose.
10.) Stitch bottom to hold it together. Make three roses slightly different in sizes.
11.) Cut a 6” piece of ribbon.
12.) Fold over to create a loop leaf. Glue ends together to hold shape. Make three leaves.
13.) Glue roses and leaves on top of pearl ends, at center, on top of pillow. Let dry.
14.) Add dots of Metallics White paint in centers of roses.
Chair Back Cover:
1.) Cut satin fabric 18” x width of back of chair plus 3”. Fold in half, with fold at top of chair back.
2.) Stitch sides.
3.) Turn right side out and press.
4.) Trace or draw 6”-8” initial on dull side of freezer paper.
NOTE: If desired, use computer to scale font to correct size. Font needs to be thick enough to be cut out with craft knife to create stencil.
5.) Cut image out on cutting mat.
6.) Place foil between layers of cover.
7.) Lay stencil in center with shiny side down. Press with iron to adhere.
8.) Squeeze equal parts of Cool Blue and Cornflower on foil. Mix.
9.) Tap sponge into paint. Tap on a clean area of foil to remove excess paint. Tap paint onto open area of stencil. Fill in initial with paint. Reload sponge as needed.
10.) Remove stencil. Let dry.
11.) With foil still between layers, squeeze spirals of Metallic White on each side, about 3” wide. Let dry.
12.) Scatter Iron-On Crystals in spiral area on each side.
13.) Preheat textile tool or iron. With tool, heavy pressure is not needed.
14.) Touch crystal for 15 to 20 seconds until attached. With iron, cover area with pressing cloth. Only touch tip of iron to Crystal being careful not to touch paint. Let Crystals cool before moving. Crystals may be added to initial, if desired.
15.) Starting at center back, glue lace along bottom edge of cover.

