Glamorous Crochet Napkin Rings
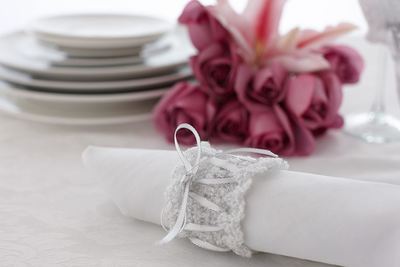
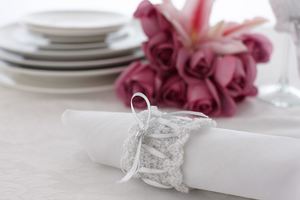 Are you looking for the perfect, elegant touch for your reception tables? These Glamorous Crochet Napkin Rings should do the trick. Made with a silver-strung yarn, they'll add the perfect amount of glitz to your celebration. Silver and simple, they'll match just about any wedding theme, and even beginner crocheters can manage learning how to make napkin rings with crochet. Try getting together all of your friends who crochet and make a day out of completing them. They'll love to feel part of your wedding and will be pleased to help the bride.
Time to Complete: In an evening
Primary Technique: Crochet

Materials:
- 861-100 Lion Brand Vanna's Glamour: Diamond - 1 Ball (sufficient to make 8 napkin rings)
- Lion Brand Crochet Hook - Size G-6 (4 mm)
- Lion Brand Large-Eye Blunt Needles (Set of 6)
- Silver ribbon, 1/4 in. (6mm) wide, about 1 yd. (1 m) for each Napkin Ring
Measurements:
Finished Circumference: About 6 in. (15 cm)
Finished Height: About 1 3/4 in. (4.5 cm)
Abbreviations:
ch(s) = chain(s)
ch-space = space previously made
dc = double crochet
rep = repeat(s)(ing)
rnd(s) = round(s)
sc = single crochet
sk = skip
sl st = slip stitch
sp(s) = space(s)
st(s) = stitch(es)
Gauge: 16 sc = about 4 in. (10 cm). BE SURE TO CHECK YOUR GAUGE. When you match the gauge in a pattern, your project will be the size specified in the pattern and the materials specified in the pattern will be sufficient. If it takes you fewer stitches and rows to make a 4 in. [10 cm] square, try using a smaller size hook or needles; if more stitches and rows, try a larger size hook or needles.
Note
Napkin Ring is worked back and forth in rows. Ends are seamed to make a ring, then edging is worked in rnds around the top and bottom edges.
Instructions
NAPKIN RING
Ch 25.
Row 1: Sc in 2nd ch from hook and in each ch across - 24 sc.
Row 2: Ch 3 (counts as first dc), turn, dc in each st across.
Row 3: Ch 1, turn, sc in each st across.
Fasten off.
FINISHING
Seam ends of Ring.
Edging
Join yarn with a sl st at seam, along one edge of Ring.
Rnd 1: Ch 5, sk first st, sl st in next st, *ch 5, sk next st, sl st in next st; rep from * around, sk more or less sts to end evenly, with a sl st.
Rnd 2: *Ch 1, (sc, ch 3, sc) in each ch-5 sp around.
Fasten off.
Work edging around opposite edge of Napkin Ring.
Weave in ends.
Ribbon trim
Leaving a 12 in. (30.5 cm) tail, weave ribbon back and forth across the right side of the Napkin Ring, threading it in and out of the ch-5 sps on either side of Ring so that ribbon makes a zigzag across the right side of the Ring. When you have laced the ribbon around the entire Ring, tie ends into a bow. Knot and trim ends of ribbon.
Read NextFabric Wedding Menu

