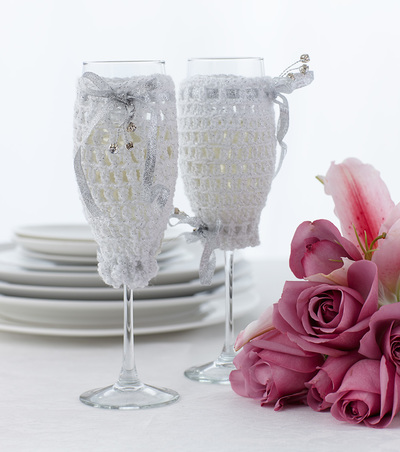
Crochet Champagne Glass Cover
 Everyone loves their champagne on a wedding day, but now you can make the bride and groom's champagne glasses special. Cover them in these adorable Crochet Champagne Glass Cover in a lovely bridal white for added elegance. These DIY wedding ideas make excellent crochet gift ideas from the mother of the bride or maid of honor. Alternatively, if you're a crocheting bride, you can make one for each member of the wedding party to thank them for all of their hard work on your big day.
Time to Complete: In an evening

Primary Technique: Crochet
Materials:
- 861-100 Lion Brand Vanna's Glamour: Diamond - 1 Ball (One ball of yarn is sufficient to make multiple covers)
- Lion Brand Crochet Hook Size G-6 (4 mm)
- Lion Brand Large-Eye Blunt Needles (Set of 6)
- Small wired charms
- Silver ribbon, about 1/4 in.
- (6mm) wide, about 1 yd. (1 m) for each cover
Measurements:
Finished Circumference: 9 in. (23 cm)
Finished Height: 5 in. (12.5 cm)
Abbreviations:
beg = begin(s)(ning)
ch(s) = chain(s)
ch-space = space previously made
rep = repeat(s)(ing)
rnd(s) = round(s)
sk = skip
sl st = slip stitch
sp(s) = space(s)
st(s) = stitch(es)
Gauge: 12 Esc + 9 rnds = about 4 in. (10 cm). BE SURE TO CHECK YOUR GAUGE. When you match the gauge in a pattern, your project will be the size specified in the pattern and the materials specified in the pattern will be sufficient. If it takes you fewer stitches and rows to make a 4 in. [10 cm] square, try using a smaller size hook or needles; if more stitches and rows, try a larger size hook or needles.
Instructions
STITCH EXPLANATION:
Esc (extended single crochet): Insert hook in indicated st and draw up a loop, yarn over and draw through one loop on hook, yarn over and draw through 2 loops on hook.
NOTES:
- Cover is worked in the rnd, beg at top edge.
- When working into a ch-1, work under the top 2 strands of the ch instead of into the ch-1 sp.
COVER
Ch 28; taking care not to twist ch, join with sl st in first ch to form a ring.
Rnd 1: Ch 2 (counts as Esc in this rnd and in all following rnds), sk same ch as joining, Esc in each ch around; join with sl st in top of beg ch - 28 Esc.
Rnd 2: Ch 3 (counts as Esc, ch 1 in this rnd and in all following rnds), sk same st as joining, sk next st, *Esc in next st, ch 1, sk next st; rep from * around; join with sl st in 2nd ch of beg ch - 14 Esc and 14 ch-1 sps at the end of this rnd.
Rnd 3: Ch 2, Esc in first ch-1, *ch 1, sk next Esc, Esc in next ch-1; rep from * around; join with sl st in top of beg ch.
Rnd 4: Ch 3, sk next Esc, *Esc in next ch-1, ch 1, sk next E sc; rep from * around; join with sl st 2nd ch of beg ch.
Rnds 5-10: Rep Rnds 3 and 4.
Rnd 11: Rep Rnd 3.
Rnd 12 (Lower Edge): Ch 2, Esc in each Esc and ch-1 around; join with sl st in top of beg ch. Fasten off.
FINISHING
Weave in ends. Cut ribbon length in half. Thread one length of ribbon through the ch-sps along the top edge and the other length through the ch-sps at the lower edge. Slip Cover onto glass. Tighten ribbons to adjust the fit. Tie ribbon ends into bows, then trim ends. Attach charms.
Read NextYou're a Gem Wedding Coasters