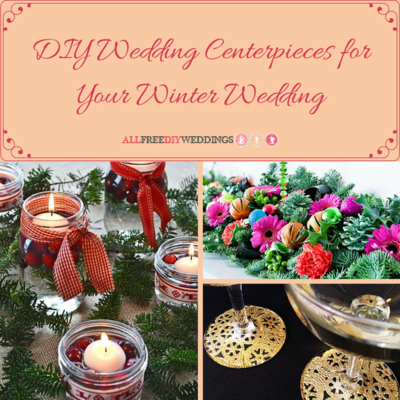
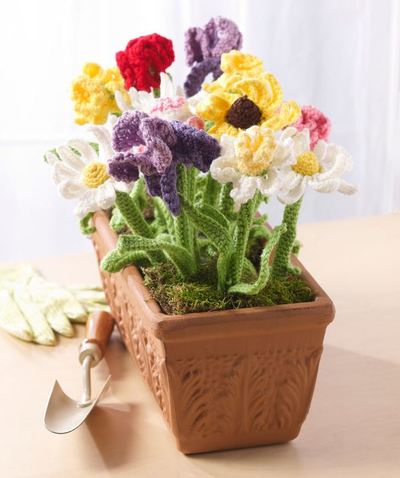
Crochet Garden DIY Wedding Centerpieces
 Learn how to crochet flowers with these Crochet Garden DIY Wedding Centerpieces and add the perfect rustic touch to your reception tables. These flowers will take some time, energy, and experience crocheting, so start a crochet circle! This would be a fantastic way to get some people involved in your wedding, or a great bridal party activity for the girls to work on while you're busy with all of the wedding planning. If you're not into crocheting a bunch of these centerpieces for your reception, crochet only one and add it as a decorative element to the bridal party's table.
Primary Technique: Crochet
Time to Complete: Longer than a weekend

Estimated Cost: $31+
Project Type: Wedding Decor
Materials:
- RED HEART® Super Saver®
- 672 Spring Green (A) - 1 skein
- 706 Perfect Pink (B) - 1 skein
- 316 Soft White (C) - 1 skein
- 324 Bright Yellow (D) - 1 skein
- 358 Lavender (E) - 1 skein
- 530 Orchid (F) - 1 skein
- 365 Coffee (G) - 1 skein
- Susan Bates® Crochet Hooks: 3.75mm [F-5 US], 4mm [G-6 US], and 5mm [H-8 US]
- Yarn needle
- One 8" (20.5 cm) chopstick for each flower
- Stitch marker
- 6" (15 cm) chenille stems (1 for each carnation, daffodil, and iris leaf)
Measurements:
Carnation measures 3" wide x 8" tall (7.5 x 20.5 cm)
Daffodil measures 4" wide x 8 1/2" tall (10 x 21.5 cm). Corona cup is 2" (5 cm) deep.
Daisy measures 5" wide x 6 1/2" tall (12.5 x 16.5 cm), with petals spread
Iris measures 3" wide x 8 1/2" tall (7.5 x 21.5 cm)
Abbreviations:
A, B, C = Color A, Color B, Color C, etc.
ch = chain
dc = double crochet
hdc = half double crochet
sc = single crochet
sp(s) = space(s)
st(s) = stitch(es)
tr = treble (triple) crochet
( ) = work directions in parentheses into same st
[ ] = work directions in brackets the number of times specified
* = repeat whatever follows the * as indicated.
Gauge: 7 sc = 2" (5 cm) in pattern; 8 rows = 2" (5 cm) with largest hook. CHECK YOUR GAUGE. Use any size hook to obtain the gauge.
Special Stitches:
reverse sc (reverse single crochet) = Work single crochet in opposite direction from which you would usually work (left to right if you are right-handed and right to left if you are left-handed). This stitch is also known as crab stitch. It creates a rope-like twisted single crochet edging.
sc2tog = [Insert hook in next stitch, yarn over and pull up a loop] twice, yarn over and draw through all 3 loops on hook.
Notes:
- Each flower is made from 2 sections: head and stem.
- For pieces worked in continuous rounds (spirals), you may find it helpful to place a stitch marker at the beginning of the first round and move it up as each round is completed.
- Carnation petals are worked with a "wiggly crochet" technique. First, you will create a grid base, then you will work stitches around the posts of the stitches and in the chain spaces.
- Daisy is shown in 2 colorways. Begin head in the color of your choice.
- Stem is made to fit an 8" (20.5 cm) chopstick (so flower can stand in soil or floral foam); you may need to adjust the length if you use a longer or shorter chopstick. Always insert wide, blunt end of chopstick in stem so narrow, pointed end can stand in soil. Check your gauge as you work so that chopstick is held snugly in the stem.
Carnation:
Stem
With medium hook and A, ch 26.
Row 1 (wrong side): Sc in second ch from hook and in each ch across, turn - 25 sc.
Row 2: Ch 1, sc in first 10 sc, ch 7, slip st in 2nd ch from hook and in next 5 ch (leaf made), sc in next 10 sc, ch 7, slip st in 2nd ch from hook and in next 5 ch (leaf made), sc in remaining sts, turn - 25 sc and 2 leaves.
Row 3: Ch 1, sc in each st, turn - 25 sc.
Row 4: Ch 1, sc in first 10 sc, [ch 7, slip st in 2nd ch from hook and in next 5 ch (leaf made), sc in next 5 sc] twice, sc in remaining sts, do not turn - 25 sc and 2 leaves.
Row 5: Working across ends of rows, sc in each row, do not turn - 4 sc.
Note: Continue in rounds.
Round 6: Working in front of sts of Row 5, sc in 4th st from the hook (to form a ring), sc in remaining 3 sts. Place marker for beginning of round and move marker up as each round is completed.
Round 7: Working in outer loops only, 2 sc in each st - 8 sc.
Round 8: [2 sc in next st, sc in next st] 4 times - 12 sc.
Round 9: [Dc in next st, sc in next st] 6 times; join with slip st in first dc - 6 dc and 6 sc. Fasten off, leaving a long tail for sewing.
Head
Grid Base
With largest hook and B, ch 4.
Round 1: [Dc, ch 1] 5 times in 4th ch from hook (beginning ch count as dc, ch 1); join with slip st in 3rd ch of beginning ch - 6 dc and 6 ch-1 spaces.
Note: You will now join grid base to stem.
Round 2: Insert hook in inner loop of any st in Round 9 of stem and working through both loops of first dc, sc in first dc; working through inner loops only of each sc in Round 9 and both loops of last round, sc in each dc and ch-1 space around - 12 sc.
Round 3: Ch 4 (counts as dc, ch 1), (dc, ch 1) in each st; join with slip st in 3rd ch of beginning ch - 12 dc and 12 ch-1 spaces.
Petals
Ch 3.
Row 1: Working 3 sts around post of each dc, 2 sts in each ch-1 space, and 1 st around post of each sc, alternate dc and hdc in a snake-like fashion up and down the grid base. Fasten off.
Note: To simulate a carnation’s many petals, randomly (ch 2, slip st around next post or in ch-1 space, ch 3), then continue working dc and hdc along the grid base.
Row 2 (optional): *Working in front loops only, join 2nd color in first st of any petal, slip st loosely in each st to end of petal. Fasten off.
Repeat from * as many times as desired.
Leaf (make as many as desired)
With medium hook and A, ch 26.
Row 1: Slip st in 2nd ch from hook, slip st in next st, working over chenille stem, sc in each ch. Fasten off, leaving a long tail for sewing.
FINISHING
Trim chenille stem as needed. Whipstitch leaves to base of stem. Bend leaves to desired curve.
Weave in ends. Insert chopstick in stem.
Daffodil:
Stem
With medium hook and A, ch 26.
Row 1 (wrong side): Sc in 2nd ch from hook and in each ch across, turn - 25 sc.
Row 2: Ch 1, sc in each st, turn.
Row 3: Ch 3, sc in 2nd ch from hook and in next ch, sc in each st, turn - 27 sc.
Row 4: Ch 1, sc in each st, do not turn.
Note: The last 2 stitches of Row 4 and all 4 stitches of Row 5 will form a ring on which the head is made. These 6 stitches will lean at an angle from the stem so the daffodil will face forward.
Row 5: Working across ends of rows, sc in each row, turn - 4 sc.
Note: Continue in rounds.
Round 6: Working in front of sts of Row 5, sc in 6th st from the hook (to form a ring), sc in remaining 5 sts - 6 sc. Place marker for beginning of round.
Round 7: Work 2 sc in each st; join with slip st in first st - 12 sc. Fasten off, leaving a long tail for sewing.
Head
Petals
Round 1: Join D with slip st in outer loop of any st of Round 7; working in outer loops only, [ch 4, slip st in next 2 st] 5 times, ch 4, slip st in next st - 6 ch-4 spaces.
Round 2: (Sc, ch 2, dc, 2 tr, ch 3, slip st in 3rd ch from hook, tr, dc, ch 3, slip st) (petal made) in each ch-4 space; join with slip st in first st - 6 petals. Fasten off, leaving a long tail to make stamens.
Corona Cup
With medium hook and D, ch 2.
Round 1: Work 6 sc in 2nd ch from hook - 6 sc. Place marker for beginning of round and move marker up as each round is completed.
Round 2: Work 2 sc in each st - 12 sc.
Round 3: Working in unworked inner loops of Round 1 of petals and both loops of previous round, sc in each st.
Rounds 4-6: Sc in each st.
Round 7: [Sc in next st, sc2tog] 4 times - 8 sc.
Round 8: (Sc, dc, sc) in each st around; join with slip st in first st - 24 sts. Fasten off, leaving a long tail to make stamens.
Weave in ends of petals and corona cup and pull up through center of corona cup. Trim to height of corona cup.
Place chopstick on stem and whipstitch edges together.
Leaf (make as many as desired)
With medium hook and A, ch 26.
Row 1: Sc in 2nd ch from hook and in each ch across, turn - 25 sc.
Row 2: Ch 1, sc in each st around chenille stem to last stitch, slip st in last st. Fasten off, leaving a long tail for sewing.
FINISHING
Trim chenille stem as needed. Whipstitch leaves to base of stem. Bend leaves to desired curve.
Weave in ends. Insert chopstick in stem.
Daisy:
Head
With smallest hook and D or G, ch 2.
Round 1 (right side): Work 6 sc in 2nd ch from hook - 6 sc. Place marker for beginning of round and move marker up as each round is completed.
Round 2: [2 sc in next st, sc in next 2 st] twice - 8 sc.
Round 3: Work 2 sc in next st, [2 sc in next st, sc in next st] 3 times, 2 sc in next st - 13 sc.
Round 4: Working in back loops only, sc in each st; join with slip st in first st. Fasten off.
Round 5: Join C with slip st in front loop of any st, ch 10, slip st in 2nd ch from hook, sc in next ch, hdc in next 7 ch, slip st in same st as join (petal made), *working in front loop only, slip st in next st, ch 10, slip st in 2nd ch from hook, sc in next ch, hdc in next 7 ch, slip st in same st (petal made); repeat from * around; join with slip st in first st - 13 petals. Fasten off.
Stem
Round 6 (right side): Join A with slip st in any unworked loop of Round 4, ch 2 (counts as first hdc), hdc in each loop around; join with slip st in top of beginning ch - 13 hdc.
Place marker for beginning of round and move marker up as each round is completed.
Round 7: Sc in next st, [sc2tog] 6 times - 7 sc.
Round 8: Working in back loops only, sc in each st.
Rounds 9-25: Sc in each st.
Round 26: Ch 4, 2 hdc in 2nd ch from hook, sc in next 2 ch (leaf made), sc in each st - 7 sc and 1 leaf.
Round 27: Holding leaf down against stem and working behind, sc in each st - 7 sc.
Rounds 28-33: Sc in each st.
Round 34: Slip st in next st, [ch 15, 2 dc in 3rd ch from hook, dc in next 3 ch, hdc in next 6 ch, sc in next 3 ch (leaf made), slip st in next 2 sts] 3 times - 7 slip sts and 3 leaves.
Round 35: Slip st in first slip st, [working across opposite side of ch of leaf, sc in first 12 ch, 2 sc in next 3 ch, 2 sc in next dc, sc in next 13 st, 2 slip st in next 2 slip sts] 3 times; join with slip st in first slip st. Fasten off.
FINISHING
Weave in ends.
Stiffen petals and leaves to straighten, if desired. Insert chopstick in stem.
Iris:
Stem
With medium hook and A, ch 26.
Row 1 (right side): Sc in 2nd ch from hook and in each ch across, turn - 25 sc.
Row 2-4: Ch 1, sc in each st, turn.
Round 5: Working across ends of rows, ch 1 [sc in first row, 2 sc in next row] twice; join with slip st in first st - 6 sc. Fasten off, leaving a long tail for sewing.
With wrong sides together, fold stem lengthwise and sew edges of Rows 1 and 4 together.
Head
Lower Petals
With D, ch 2.
Round 1 (right side): Work 6 sc in 2nd ch from hook - 6 sc. Place marker for beginning of round and move marker up as each round is completed.
Round 2: Holding Round 1 of head to Round 5 of stem and working through both thicknesses, inserting hook through next st of Round 1 and then inserting in next st of Round 5 from inner side, sc in each st.
Round 3: Working in inner loops only, sc in each st.
Note: Continue in rows.
Row 4: Working in outer loops only, 2 sc in next two stitches; leave remaining sts unworked, turn - 4 sc.
Rows 5-9: Ch 1, sc in each st, turn.
Row 10: Ch 1, sc in first st, dc in next 2 st, sc in last st; working across ends of rows, work 7 slip sts evenly to Round 3, do not turn - 2 sc and 2 dc.
Rows 11-24: Repeat Rows 4–10 twice.
Ruffle Edge
Row 25: Ch 1, working across ends of rows and in each st, (sc, dc) in each row and st evenly around every petal. Fasten off, leaving a long tail to make stamens.
Upper Petals
Round 1: With medium hook and working in unworked loops of Row 4 of lower petal, join F with slip st 2nd unworked loop behind first petal, ch 1, (sc, dc) in same st as join, (dc, sc, slip st) in next st, *(sc, dc) in next st, (dc, sc, slip st) in next st; repeat from * once; join with slip st in first sc - 6 sc and 6 dc.
Note: Continue in rows.
Row 2: Ch 3 (counts as first dc), sc in first dc, skip next sc, sc in next dc, dc in next sc; leave remaining sts unworked, turn - 2 sc and 2 dc.
Rows 3–5: Ch 1, sc in each st, turn - 4 sc.
Row 6: Ch 1, sc in first st, dc in next 2 st, sc in last st; working across ends of rows, work 7 slip sts evenly to Round 1, do not turn. Skip the slip st at the bottom.
Rows 7–11: Repeat Rows 2–6.
Rows 12–16: Repeat Rows 2–6.
Ruffle Edge
Row 17: Work same as Row 25 of lower petals.
Leaf (make as many as desired)
With A and medium hook, ch 26.
Row 1: Sc in 2nd ch from hook and in each ch across, turn - 25 sc.
Row 2: Ch 3, slip st in 2nd ch from hook, sc in next ch, working over chenille stem, sc in remaining sts. Fasten off, leaving a long tail for sewing.
FINISHING
Using photograph as a guide, weave ends of D and F to center of flower to create stamens.
Trim to desired length. Sew leaves to base of stem.
Weave in ends. Insert chopstick in stem.

Your Recently Viewed Projects
Thanks for your comment. Don't forget to share!
Catsitt
Sep 12, 2018
This is stunning. I am in awe of it. I keep meaning to try and learn how to crochet but I there just isnt enough hours in the day! Does anyone know if there is a knitting equivalent? I would really love to try a knitted version of this, would anyone have a pattern or a link to one?
Report Inappropriate Comment
Are you sure you would like to report this comment? It will be flagged for our moderators to take action.
Thank you for taking the time to improve the content on our site.